Exercise 5 : Animation in 2D
Description
In this exercise, you will help restore motive abilities of several whimsical characters by utilizing Unity’s 2D Animation system.
In case of any problems, please see the FAQ and the Problems and Solutions. If your problem is not listed, contact me by e-mail (Tomas Polasek : ).
Instructions
The exercise progressively takes you through some important parts of 2D animation:
- Controlling animation from code and using the Animator interface
- Preparing a 2D character sprite for both rigid and skeletal animation
- Creating animation clips for the character and using an Animator Controller
Download the project template from the Materials section and follow the same general procedure as in the case of previous exercises. In case of problems, see the information for the second exercise. Do not forget to switch to 2D mode. Sometimes, it is necessary to exit 2D mode and re-enter it when you reload Unity.
After setting up the project, you should be able to run it and move through the scene by using the a standard control scheme - WASD + Space.
Controlling Animation
In Unity, most of the difficult work required for animation is already done for you. The basic element we will use is the Animator component, which allows playback of Animation Clips through the use of an Animator Controller asset. Before we get to that, however, you will need to fix some problems with the current state of the project.
As you probably noticed, there is something wrong with the main character. Even though he is happily moving through the scene, he is rather rigid. It would be much better if his actions were accompanied by corresponding animations of the sprite.
To get started, look into the Character2DMovement script in the Assets/Scripts/Player/ directory. The important parts of the code are located in the AnimateCharacter function, starting on the line 188.
Start by correctly orienting the character, based on the direction of movement (Task #1a). There are several ways to accomplish this, but one of the easiest is to simply modify the transform of the base GameObject based on the desired direction. You can achieve this by rotating the character by 180 degrees around the y-axis. For more details and hints, see the comment in the script file.
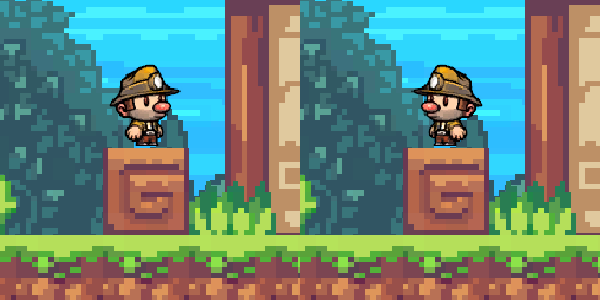
After finishing the first part of this task, our character now looks in the correct direction. However, he is still rather rigid. Some animations would certainly help with that! To achieve this, you will need to pass the current state from the gameplay code to the Animator component, thus driving the animation (Task #1b). Again, the comment within the code itself should provide you with all the necessary information.
When you are finished, the character should now be able to walk, jump, fall, crouch, crawl, and, of course, stand idly by.
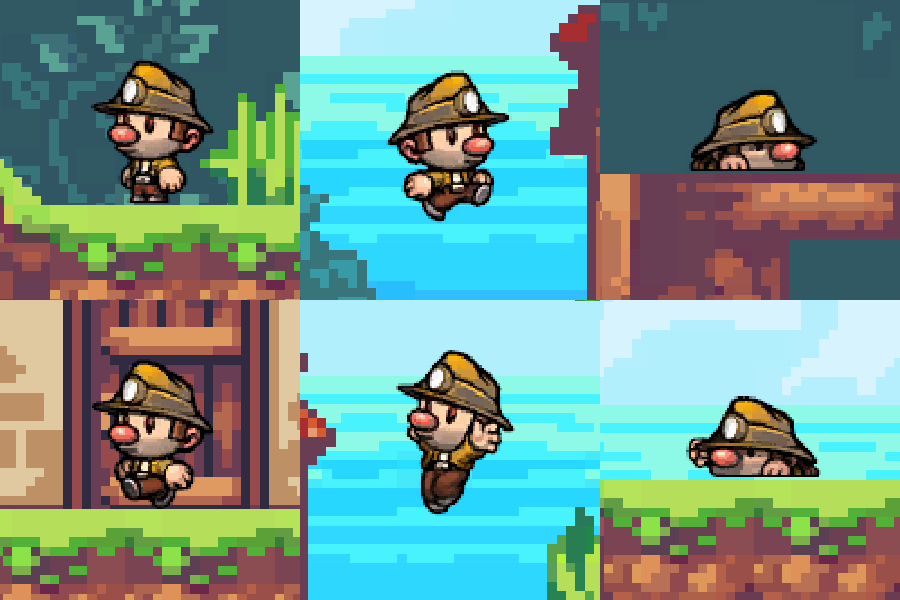
Now, let’s look at the Animator Controller in some more detail. Open the SpelunkyAnimationController asset in the Assets/Animations/Spelunky folder. You should now be greeted with the Animator interface:
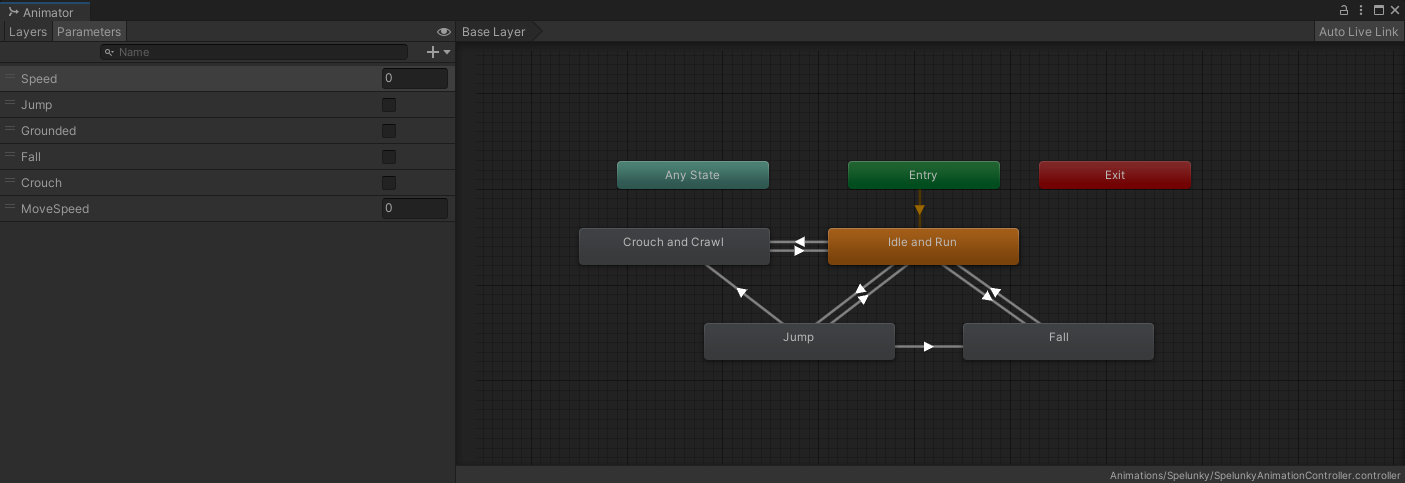
It consists of three main parts. The Layers and Parameters are contained within the tab on the left side of the window, while the right part of the window shows the Main View. The third part of this interface is actually in the editor Inspector, which shows the details concerning the currently selected element
Animation Layers are used for more advanced animations - such as animating several parts of a character separately. The Parameters tab contains all of the animation parameters, which you can set from the gameplay code. Notice that the parameters are named exactly the same as the states you sent in the task #1a. The values set from the code are passed to the state machine through these parameters. You can switch between Layers and Parameters by using the switch in the top left corner.
The animations are represented by a State Machine, which is visualized in the Main View. Each node represents a state, while the edges show which transitions are possible. There are several special types of nodes. The Entry node (green) is the starting state of the state machine. It has a special connection to the default node, which is indicated by the orange color. The Any State node (turqoise) represents all nodes within the graph, simplifying transitions which can happend from anywhere. Finally, the Exit node (red) tells the Animator that the animation is finished. For more information on the nodes and transitions, you can also see the Unity Documentation.
Most importantly, each node and edge has special properties. These determine how the animations are played. When you select nodes and edges, the Inspector displays its properties. First, select the Jump node and see that it is indeed defining a Motion, which is set to the Jump animation asset. Now select the Idle and Run node. This node is of a more complex type. It defines its behavior through a Blend Tree. Before we continue, notice that most of the properties can be controlled from the code as parameters. In order to actually see the Blend Tree, double click the Idle and Run node. This takes you inside the motion specification, with a separate graph. Blend Trees allow us to blend between animation clips. To see how this one works, select the main node named Blend Tree. The details are again shown in the Inspector. In this case, we use the Speed parameter to change between the Idle and Run animations. You can see this in effect by draggin the Speed value knob on the main node. Notice that the highlight slowly shifts from Idle to Run. Now return back to the main graph by using the orientation bar in the upper part of the window (Base Layer).

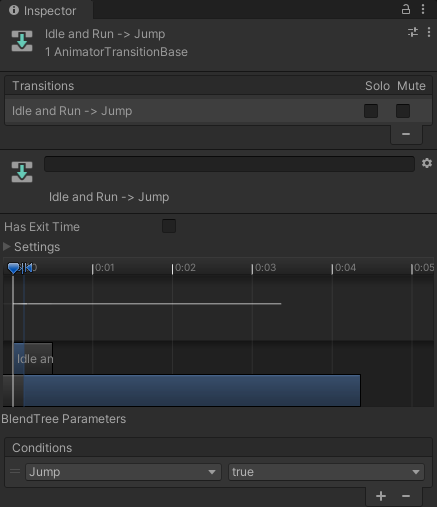
Select the edge going from Idle and Run to Jump next. The properties of each edge specify both how the transition should be performed, as well as what are the conditions. The middle part of the property window contains the transition timeline, which allows to change how long the transition should take. In the bottom part, the conditions are listed. As you can see, we use the Jump property, and transition only when it is true.
Final, and probably most useful, thing to know about the Animator is that it can be used for debugging as well. Run the game, keeping the Animator window visible. You can achieve this by dragging the Animator tab to its own window. Now select the Main/Player/Spelunky(Clone) GameObject. The Animator now displays the current animation state machine for the selected character. Try running around the scene and jumping to see how the information is presented.
Character Preparation
Now that you gave some more fluidity to our main hero, it is time to prepare your own character. In the second task, you will import a pre-made character and prepare it for both rigid and skeletal animation.
Start by preparing the data by importing the character sprite. Within the Project window, move into the Assets/Sprites/Characters/Rikr/ folder, open the right click menu and select the Import New Asset… option. Locate the RikrSprite.psb file in you filesystem under ./OtherMaterials/Rikr/. Select the imported asset and wait for the import to finish. You may need to re-select the asset to make the properties visible. Now, make sure the Texture Type is set to Sprite and Sprite Mode is Multiple. Next set the Texture -> Filter Mode to Point, to keep the original pixels without any filtering, or Bilinear for a more smooth look. Apply changes, if necessary. Finally, open the sprite editor by pressing the Open Sprite Editor button located within the General tab.
The Sprite Editor consists of multiple tools, which can be switched using the selector in top-left corner. Today, we will be using the Sprite Editor and Skinning Editor modes. First, switch to Sprite Editor. As you can see, Unity has already split the sprite into its component parts, thanks to the PSB importer. All you need to do is to separate the parts of your model into layers, keeping the composition in place. In case you don’t have access to Photoshop, you can also use GIMP. In this case, you may need to first export a .xcf file and then rename it to .psb, but everything works just as well.
Now, select the left hand sprite and see the information displayed in the bottom right corner. You can manually edit the bounding box of the sprite, border, and its name. Importantly, notice the pivot point settings (small blue circle), which allow us to set a point around which the part should rotate. For example, in case of arms, we would expect them to rotate around the shoulder joint, legs around the hip joint, etc. This is especially important for Rigid Animation, as we will see later. Before continuing, you should go through all of the body parts and set their pivot point (Task #2a). You can do this by either dragging the small blue circle, or by setting the Custom Pivot value directly. Don’t forget to save your work by using the Apply button in the top right corner of the window.
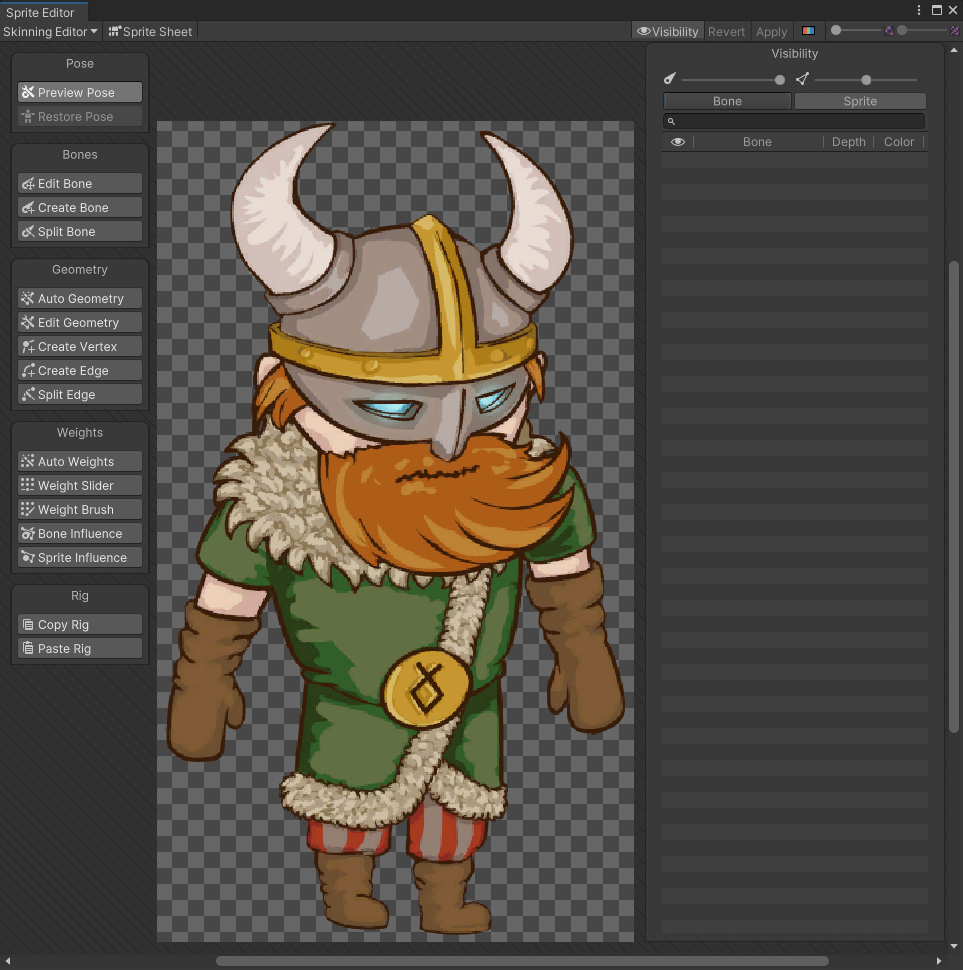
Next, you will perform Rigging and Skinning of the character in 2D (Task #2b). First, Switch to the Skinning Editor by using the selector in the top-left part of the window. The Skinning Editor consists of the toolbar on the left side, the work are in the middle, and the bone hierarchy on the right. The bone hierarchy window may be closed by default, open it by using the Visibility button in the top right corner of the window. One further advantage to composing the character in an external software is that it is already pre-assembled, significantly simplifying our work.
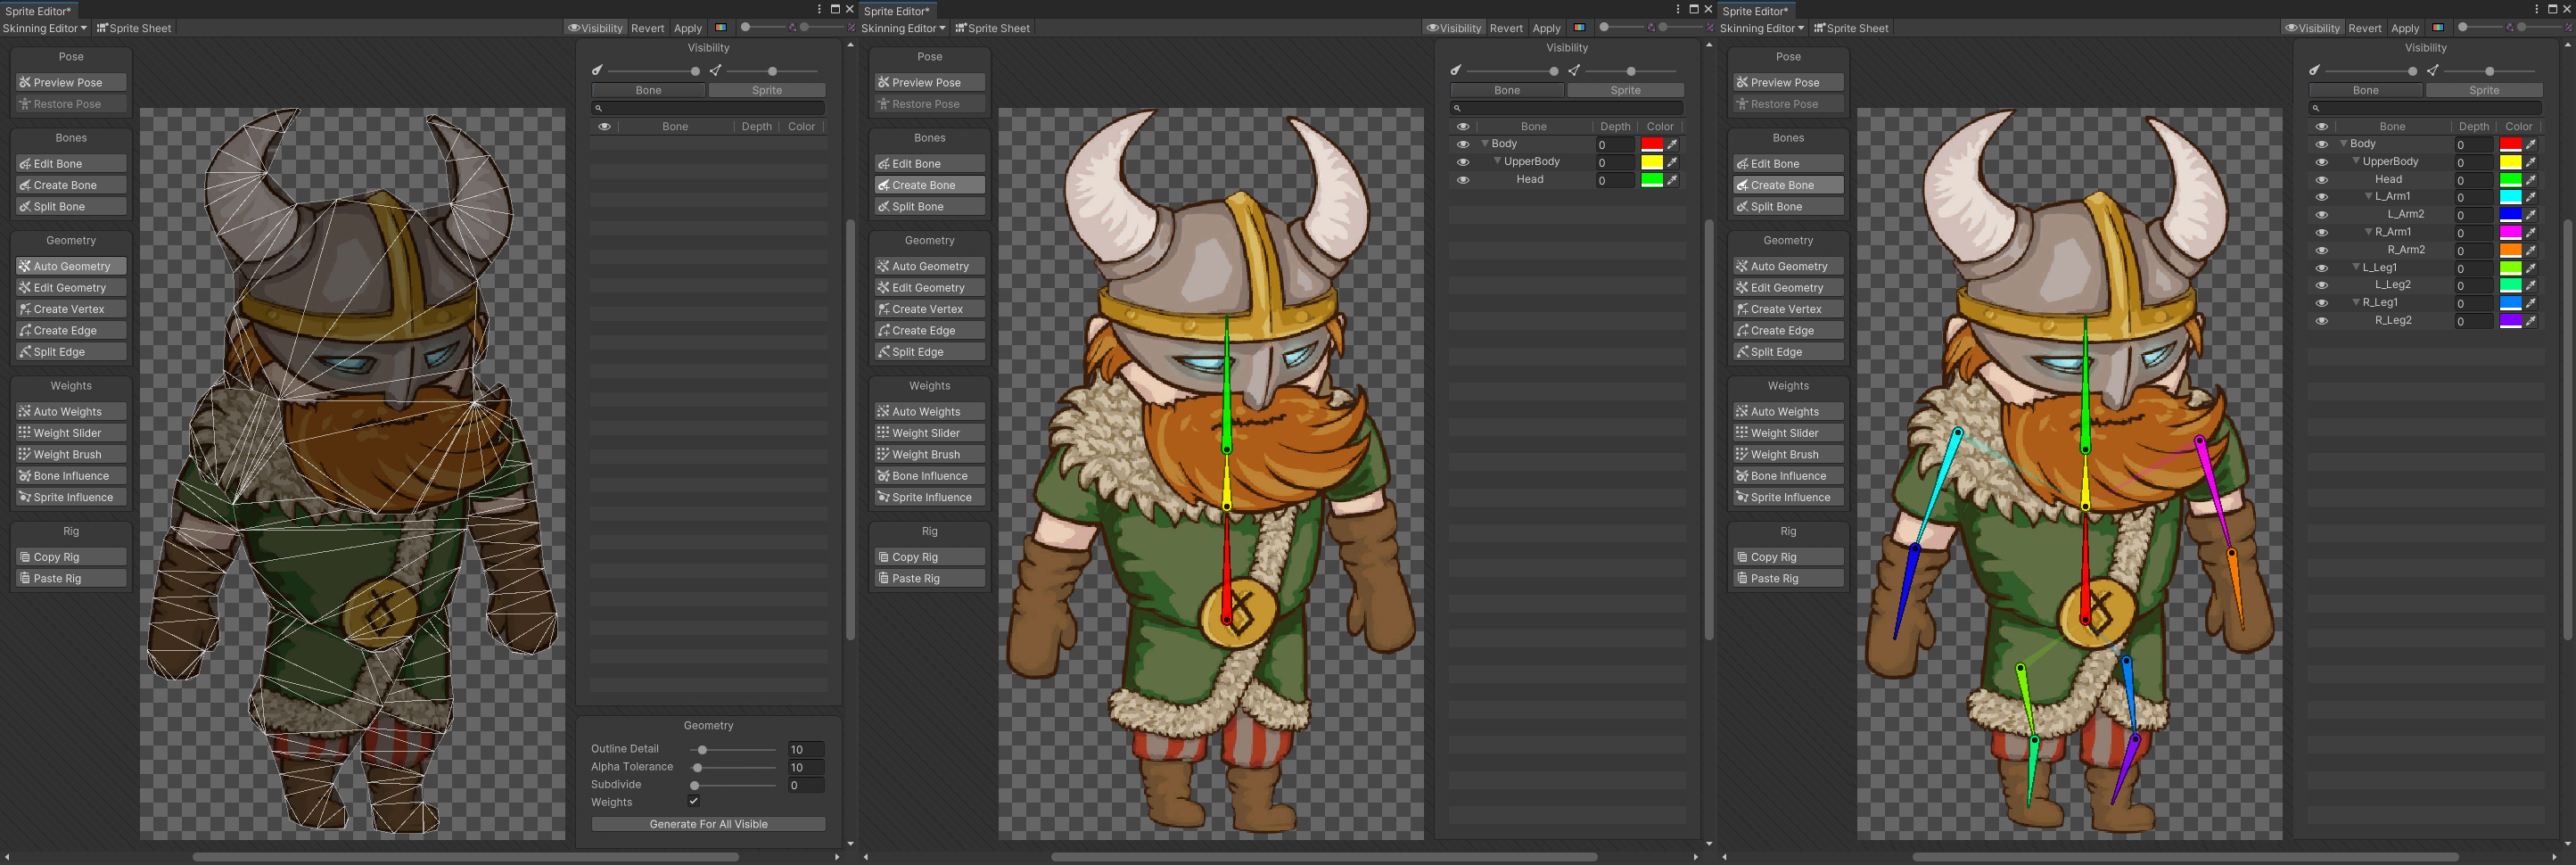
To start off, generate the proxy geometry which will later be used for the skinning process. Simply select the Auto Geometry tool, deselect any sub-part by double clicking outside of the sprite, and press the Generate For All Visible in the bottom right corner. Next, you will need to create the skeleton. Select Create Bone and place the two main bones within the thorax and one bone for the head. To end the bone chain press the right mouse button. Next, create bones for the limbs, two for each. First select the point which will act as the parent - use the upper or lower thorax bone for hands and legs respectively. Notice that the bones have a faint connection to the parent bone. Now name the bones by selecting each of them in the hierarchy and modifying the Name property.
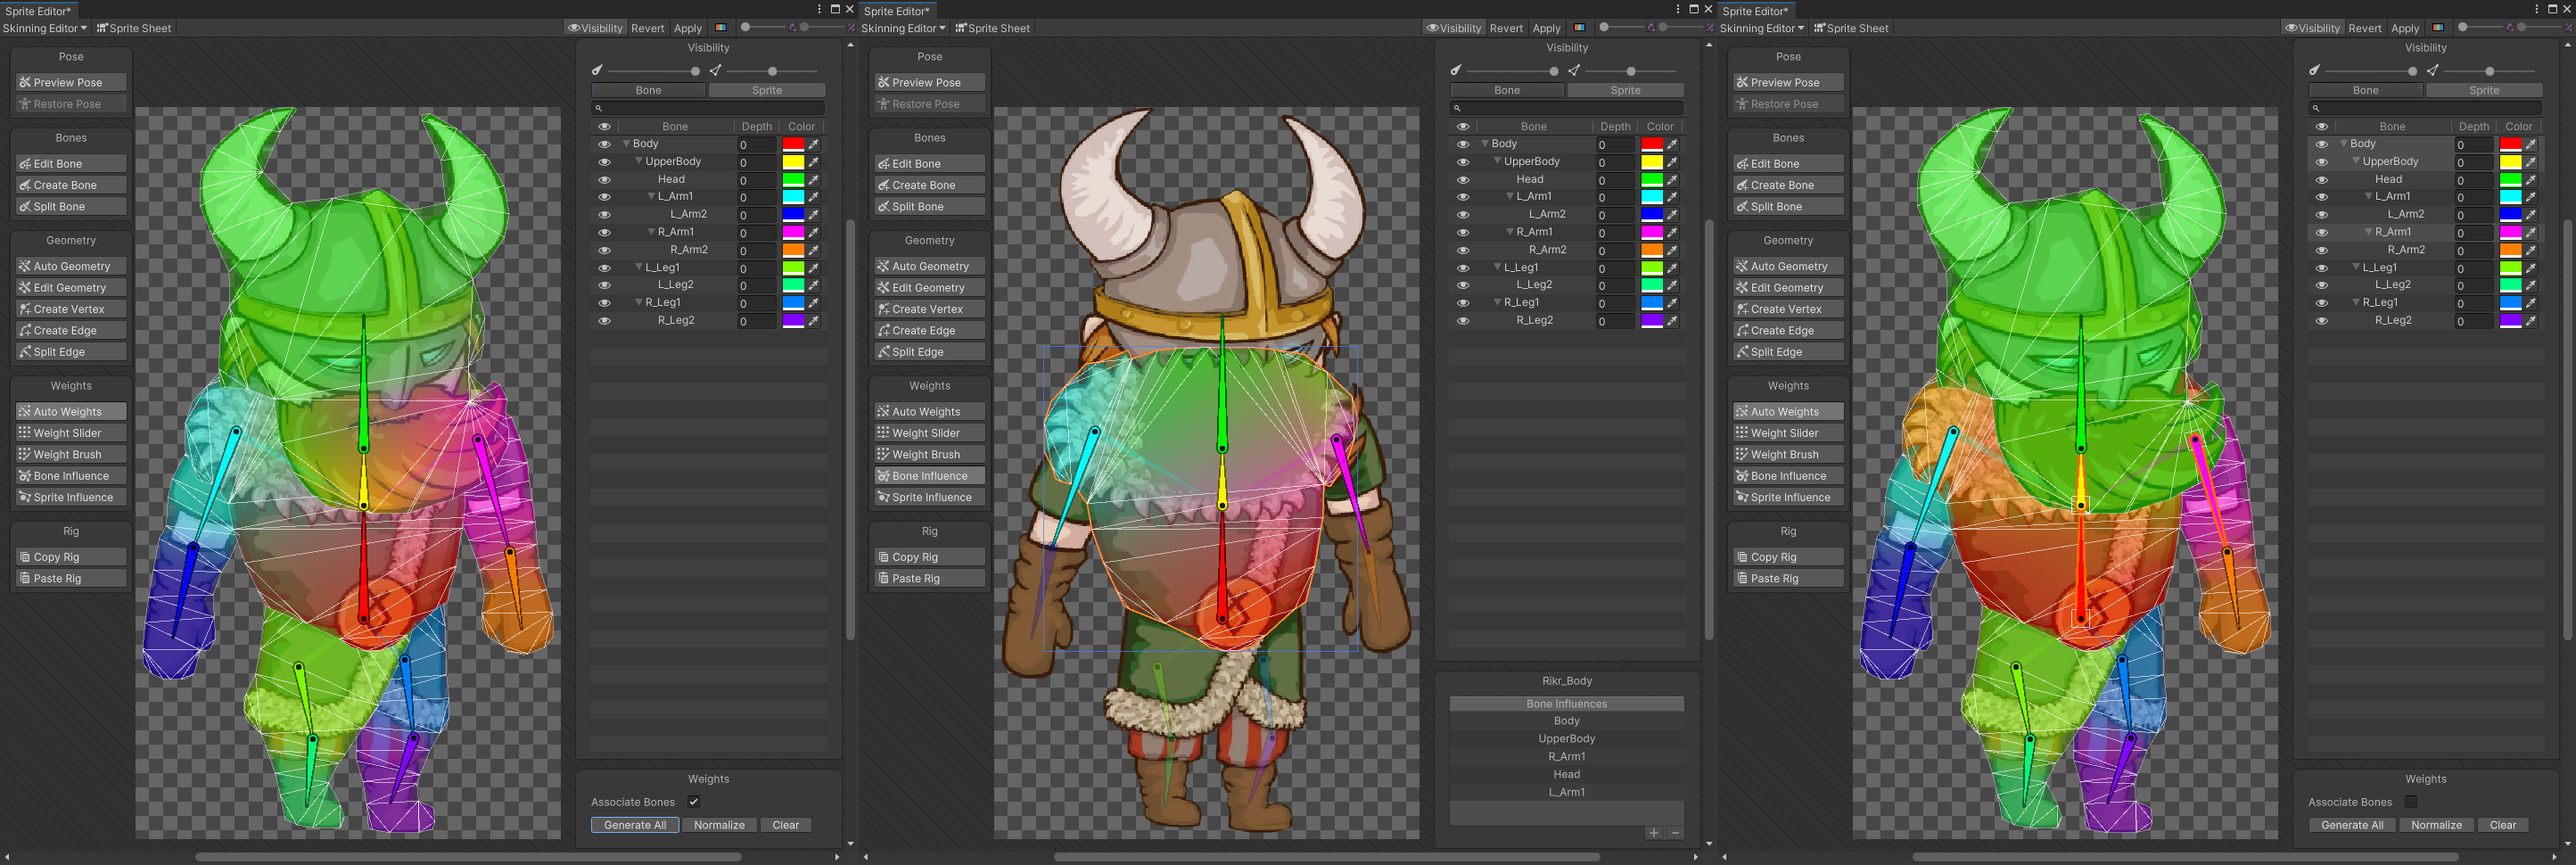
The last objective is to perform Skinning by assigning bone weights to the proxy geometry. This process allows us to tell Unity which part of the sprite should move with a given bone. We do this through the use of the proxy geometry. Start by running the Auto Weights. Select it from the tool tray, deselect sub-parts by double clicking outside of the sprite, check the Associate Bones option in bottom right and press Generate All. The default weights are usually not assigned correctly. For example, double click the chest sprite to select it. Notice that colored bones are associated to this part, while grey bones are not. As you will probably find out, some bones were mistakenly assigned to this part. This can be fixed by using the Bone Influence tool. You can remove or add bones by using the control interface in the bottom right corner. Now remove all of the bones from the chest, except for the first two bones you have created (red “Body” and yellow “UpperBody” on the image). Optionally you can also also keep the first bone for each leg which will be useful to prevent mesh cracking. Go through all of the other parts and keep only corresponding bones for each of them. When you are finished, you will need to re-generate the weights by using the Auto Weights, but do not forget to disable the Associate Bones. Again, save your work (top-right, Apply).
Now you can check your rigging by using the Preview Pose tool. Drag and rotate any of the bones to check they are correctly connected to the skeleton. You can reset the pose by using the Restore Pose tool. In case of any problems, you should return to the bone or weight editor now, since these may later not update correctly when we start with the animation.
Animating the Character
In this final task, you will create several animation clips for your freshly prepared character (Task #3).
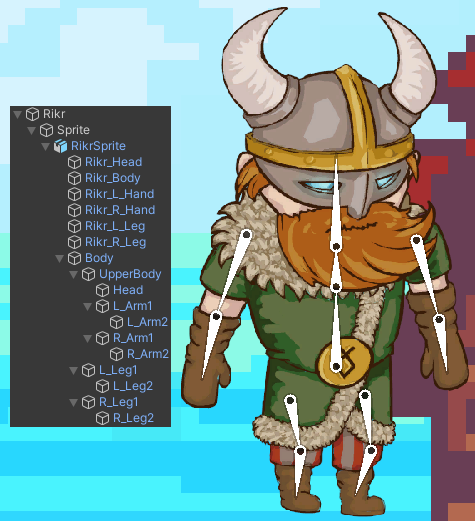
Start by placing the Assets/Prefabs/Characters/Rikr prefab into the scene. Then unpack it by right clicking on the Rikr GameObject in the Hierarchy and select Prefab -> Unpack Completely. Next, reset its position setting it to (0, 0, 0) under Transform of the root object. This will make sure that our character is centered. Delete the placeholder RikrSprite under Rikr/Sprite/ in the GameObject hierarchy. Now you can finally place your RikrSprite asset located in Assets/Sprites/Characters/Rikr/ under Rikr/Sprite/ within the scene hierarchy. These introductory steps are not part of the Unity animation system, but are necessary to make your new asset work within the framework of the template. This concludes the preparatory phase. When you select the Rikr GameObject, you should notice that both the segments and the bones are part of the hierarchy and should look something like this:
Start by creating the Animator Controller under Assets/Animations/Rikr (Create -> Animation Controller), name it RikrAnimationController and set it as the current controller for the Animator component of the Rikr Game Object. Open the Animator UI by double clicking the controller asset and add all of the parameters you have seen in the first task:
- Speed : float
- MoveSpeed : float
- Jump : bool
- Grounded : bool
- Fall : bool
- Crouch : bool
The Animator Controller is now ready for the animation clips.
To start creating animation clips, select the Rikr Game Object and open the Animation window (Window -> Animation -> Animation). You should be prompted to create a new Animation Clip by pressing the Create button. Place the animation clip into the Assets/Animations/Rikr/ directory, and name it Idle.anim.
Before creating the idle animation, let us first look at the UI of the Animation window. It is divided into two segments. The list of target properties modified by our animation is on the left, while the timeline is on the right. The timeline represents the time within a given animation clip. The vertical white line (“scrubber”) represents the current time. The simplest way to create a new animation is to use the Record mode. Start it by pressing the red circle button in the top left corner of the UI. This mode automatically records any changes you make to the character and places them as keyframes into the timeline.

A Keyframe is the smallest unit of animation. It represents a set of properties and associated values. Any values which are not modified are kept at their previous value. Modified values are interpolated between two consecutive keyframes. Lets try this now by first placing the scrubber in the timeline to the 0:15 mark. Then try, for example, moving the characters arm while the record mode is enabled and you should see the system automatically place a keyframe. One keyframe is placed at the beginning (default pose) and one at the 0:15 mark. Now, stop the recording mode and try moving the scrubber between 0:00 and 0:15 time marks. You should see the animation system automatically interpolate the in-between frames of the animation, producing a smooth transition.
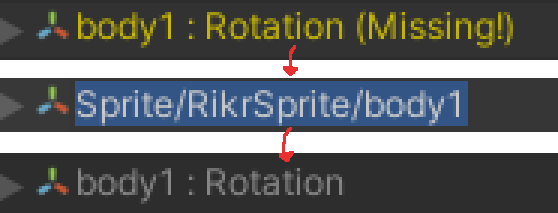
When adding additional properties, you should be careful about which Game Object is currently selected. It should always be the one with the Animator component. In case of our Rikr character, that is the root Game Object containing the Sprite sub-object. In case you already created your animation using the incorrectly selected Game Object, they will appear yellow with (Missing!) text appended. For a quick fix, please see the FAQ.
The keyframes can also be modified manually by pressing the Add Property button. You can select keyframes, move them, copy and paste, and delete with standard shortcuts. It is useful when an animation clip ends with the same state as it began. To achieve this, you can simply box-select the 0:00 keyframes, copy and paste them at a required end time. For some additional tips on using the Animation Timeline, please see Unity Docs.
You should now finish the idle animation, which can be just an empty clip, and create at least 2 additional animation clips representing running (Run.anim) and jumping (Jump.anim). Try to create something simple at first, no need for realism. Later, after completing this exercise, you can practice further by creating other animation clips.

Now that you have your Animation Clips, we can put them into action by using the Animator Controller. But first, some more boilerplate. To make the character switching easier, you will need to convert your Rikr Game Object into a prefab. First make sure that the Rikr Game Object doesn’t have any translation applied - set it to 0, 0, 0 in case it does. Then drag the Game Object from the Hierarchy into the Project window, placing it under Assets/Prefabs/Characters. This should create it under a name Rikr1. Finally, select the Player Game Object, scroll to the Character Slector component and replace the already added Rikr character with your newly created Rikr1 prefab (within the Characters list at the bottom of the Character Selector script). Now, you can hide the Rikr GameObject from the Hierarchy window. To test that everything is setup correctly, start the game and switch the character by pressing the numerical keys (1-5). If you set the Rikr character correctly, it should be repeatedly playing one of your animation.
Open the Animator Controller asset for Rikr (RikrAnimationController). In case there are nodes already present, select all and delete them - only 3 colored nodes “Any State”, “Entry” and “Exit” should remain. Now place all of your animation clips into the workplace by dragging them from the project window. As a first step you should make your Idle animation default (if not already default / orange) by right-clicking it and selecting Set as layer default state. Next, connect the nodes together by using the context menu and selecting Make Transition. Take inspiration from existing Animator Controllers within the project template. In the most simple case, you could arrive at something similar to the following configuration:

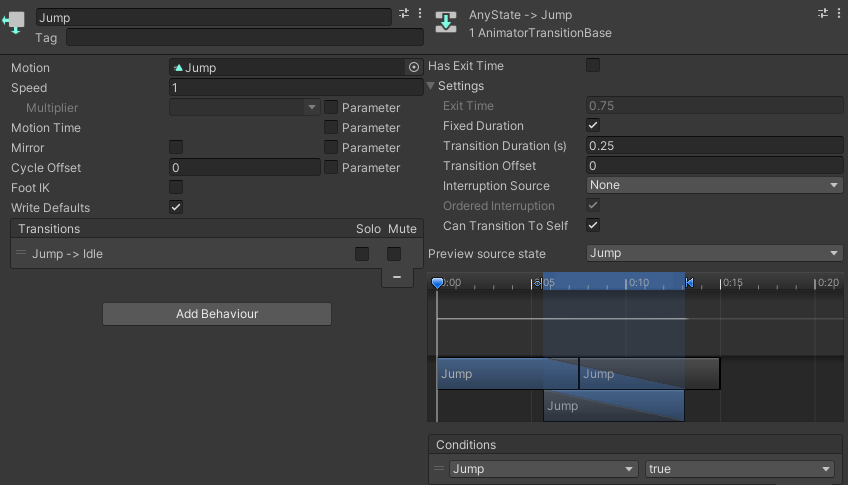
Remember, that you can select both the nodes and edges to see and edit their properties. You will need to use the Conditions to determine when a transition between animation states should occur. For example, you could configure the Jump node (left) and the transition from Any State to Jump (right) as follows:
You should now test your controller ingame, and perform at least a few iterations. You will know when you are finished with this task once you are satisfied with your results. After verifying that everything works, you can delete the Rikr object from your scene hierarchy.
Submit the Exercise
Submit the results according to the procedure detailed in the Exercise Submission chapter.
Task checklist:
- Enable animation control for the Spelunky character
- Prepare the Rikr character for rigid and skeletal animation
- Create animation clips for the Rikr character and test them ingame
FAQ
Following are some problems and solutions which may occur during this exercise:
- Rikr character disappears when running the game : Make sure you have instantiated the Assets/Prefabs/Characters/Rikr prefab. There should be no Player Control components on the root Game Object (Character Selector, etc.). If you find them, then you should delete the Rikr Game Object from you hierarchy and use the prefab instead.
- Newly created animation does not work on the final character : Check whether the attributes are named correctly, relative
to the Game Object. Select the base Game Object with the Animator component (Rikr, contains Sprite sub-object). Then,
select your new animation in the Animation window. If you see any lines with yellow test and (Missing!) appended,
you are on the correct track. Now, in order to fix this, select each yellow attribute in turn and press F2. This allows you
to rename it, which you should use to provide the correct relative path. For example, if you selected the RikrSprite
instead of the root Rikr Game Object, you will have the name body1. The correct full path is Sprite/RikrSprite/body1.
Go through every attribute, prepending the correct prefix path.
Materials
Project Template : [zip]
Credits
All of the non-original assets are credited in enclosed text files