Exercise 2 : Unity Project
Description
The goal of this exercise is to get acquainted with the Unity Platform, build a simple project, and publish it on the web.
First, follow the instructions to setup the environment and then continue with the project and publishing steps.
In case of any problems, please see the FAQ and the Problems and Solutions. If your problem is not listed, contact me by e-mail (Tomas Polasek : ).
Environment Setup
This section contains instruction on how to setup a basic game development environment to get started. You can use any text editor you wish. However, you should use the specified version of long-term-support (LTS) Unity in order to assure compatibility with the provided project templates.
Unity
Start by downloading the Unity Hub and installing it. If you are using Linux, you may need to make the AppImage executable first:
$ chmod +x UnityHub.AppImage
$ ./UnityHub.AppImage
Create an account, login, and activate a personal license if necessary.
Next, install the Unity Editor by going to the main Unity Hub screen and Installs -> Install Editor. Search the tabs (Official or Pre-releases) for the LTS release of the Unity Editor with version 2022.3. All exercises were tested on Unity version 2022.3.44f1, but should work on version .44f1 or greater. In case the specific Unity version is not available from the Hub, check the Unity Version Archive. Choose Install and make sure that WebGL Build Support is enabled under the Platforms. The rest of the options are up to you. Keep the installation running in the background and continue by setting up the IDE in the next section.
IDE
The choice of an Integrated Development Environment (or text editor) is up to you. However I recommend using JetBrains Rider, which is available for free if you are a student. You only need to provide your school e-mail during the registration and confirm it, which will allow you to use Rider and many more JetBrains IDEs without any subscription.
Version Control
Version control is an important part of any project and even more so for games which take up considerable amount of effor to develop. For direct integration into your Unity projects, you have a choice between:
- Perforce : Larger projects with many resources, assets, and collaborators. Usually prevalent in AAA studios.
- Plastic SCM : Integrated tools, quite easy to use. Can be used for free.
- GitHub Unity : Simple, straight-foward for git users, utilizes GitHub repositories.
For any real projects, I would recommend using PlasticSCM (hobby) or Perforce (AAA).
However, with simplicity in mind, we will be using git. It has some disadvantages -
git is not very good with large files. However, that should not pose a problem for
smaller projects such as the following exercises.
Start by downloading and installing the git command line utility.
To test that the installation completed successfully, open a terminal (or command line) and
type git --version. You should see the version of you git printed out.
Unity Editor
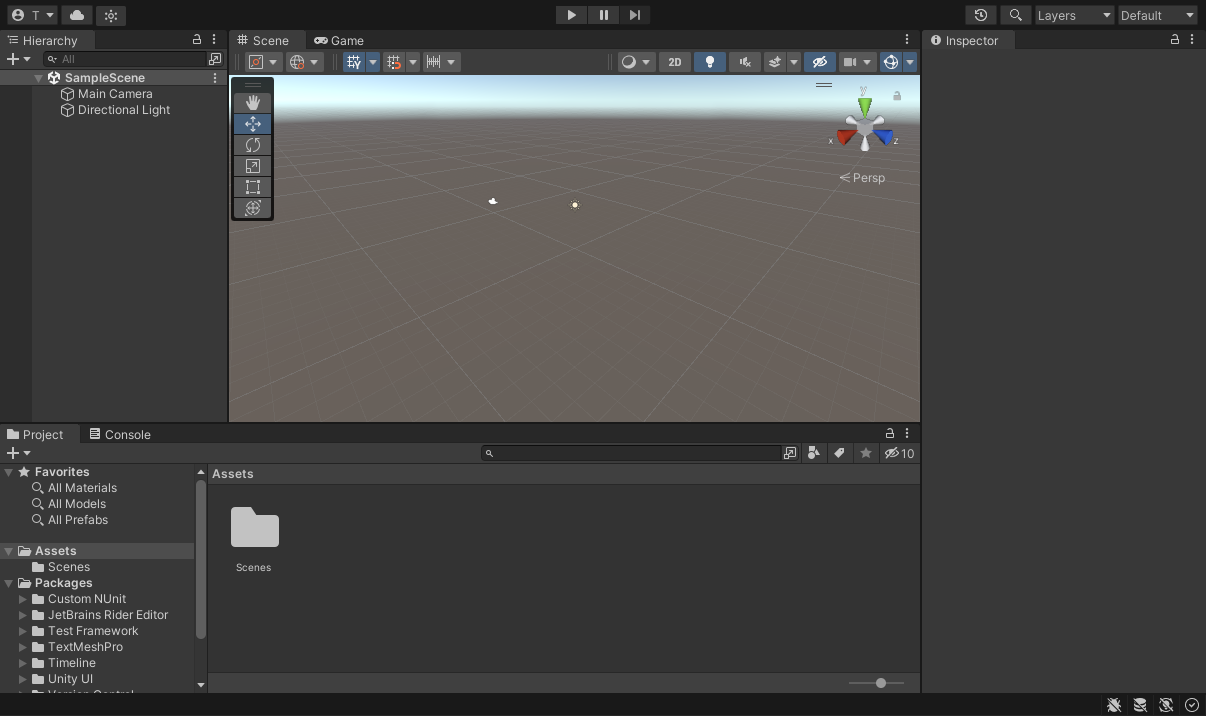
Check the Unity Hub and wait until the installation of the editor is finished. Next, go to Projects -> New project, choose Editor Version (2022.3), select 3D and fill in Location and Project name. Create the project and wait for the initialization to finish - it may take a couple of minutes. You should be greeted by the following screen:

First order of business is setting up integration with your preferred IDE. Go to Edit -> Preferences -> External Tools and select the desired External Script Editor (e.g., Rider). To make sure the project is setup correctly (and whenever you change IDE), also press the Regenerate project files button.
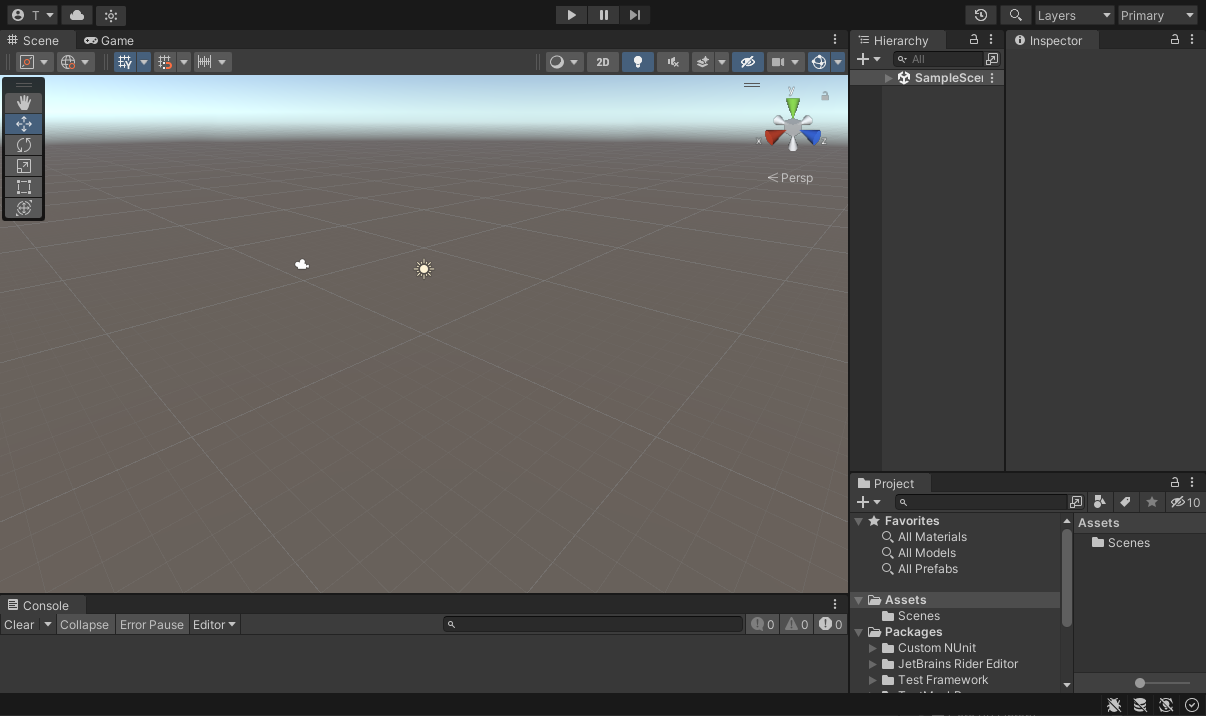
The starting window layout is usable but you will probably quickly find that some things are not optimal for you. For an example, I have provided a simple layout in the Materials section as an alternative starting point to the official layout. You can use it by first downloading the layout and then importing it in Window -> Layouts -> Load Layout from File. After applying the layout, the editor should now look like this:

Next, let us look at how assets and packages work in Unity by installing some sample assets. There are two ways of installing packages in Unity - manually or from the Asset Store. Manual installation starts by downloading the .unitypackage and then importing it by Assets -> Import Package -> Custom Package… . This way is more robust and works on all operating systems.
However, the more user-friendly and expected way is to use the Asset Store. This is accomplished by first locating the package on the Asset Store website - for example some 2D Assets - and pressing the Add to My Assets. You may need to login first, before the button is available. Then, in the Unity Editor, go to Window -> Package Manager, select My Assets in the Packages dropdown menu, and locate the Asset in the list. Finally, you can install it for your current project by pressing Download in the bottom right corner, followed by Import -> Import.
The last step in setting up the editor is the preparation of the git command line utility. In case you
are already familiar with git and have an account on any of the git hosting websites, you can skip this
step. If not, go to any of the git hosting services (GitHub, GitLab, Bitbucket, …) and register an account.
Next, create a new repository - e.g. “IZHV GIT Test” - and follow the instructions to get a local copy
of the repository onto your computer. This usually includes either pulling the repository with git pull <URL>,
or initialization of a fresh local repository by using git init and then connecting to your remote
with git remote add origin <URL>. Once you have finished, you should have a working repository. Test this
by using the git status command in the root directory of the repository. In case you are a beginner, please
see the Quick Guide.
Most of the general git ideas apply, however, there are some specifics for game-related projects. For one,
there may be some large files which are not necessary to push to the repository. For example, once you open
the project, there will be a Library directory, usually over 1GB in size. I have provided a generic
.gitignore file for most of the exercises, but you should still be cautious of what you push into the
remote repository.
Although I recommend using git, I also recognize it may be difficult for non-programmers
to use. If you are inexperienced with Linux and / or git operations, it may be difficult
to comprehend. Give it a chance and it may surprise you how useful tool it can be.
However, git shouldn’t bar you from completing the exercises. So, if you gave it a chance
and still can’t make it work, you can use the following alternative. Proceed with submission
as detailed in Exercise Submission. Skip creation of the git repository. Once
you finish the exercise, build it and upload the sources to a reputable cloud storage - e.g.
GoogleDrive, OneDrive, or School NextCloud. Make sure you exclude the Library folder -
it is usually quite large and unnecessary. Next, place a link to the uploaded file to the
corresponding data/exe#/link.txt file. Do similar procedure for the completed web template,
placing the link into data/link.txt.
The Exercise
Finally, we cam move onto the exercise itself. We start by presuming that you have a working environment by completing the steps above.
Your task for this exercise is threefold:
- Get acquainted with the Unity Editor
- Fix the provided game template
- Export the result and add it to your web template
Import the Project
Download the project template from the Materials section and extract it to where you wish to store your Unity projects. Make sure that the path you choose is not too deep in the filesystem hierarchy, since long paths may cause problems with missing files! Go to Unity Hub -> Projects -> Open and select the extracted directory (IZHV_E2), then open the project. You shouldn’t have any problems with different editor version. However, if the recommended version is not available, make sure your version is 2022.3 or greater and then switch the project version when prompted. After the initial import, which may take a couple of minutes, you should be greeted by the following screen:

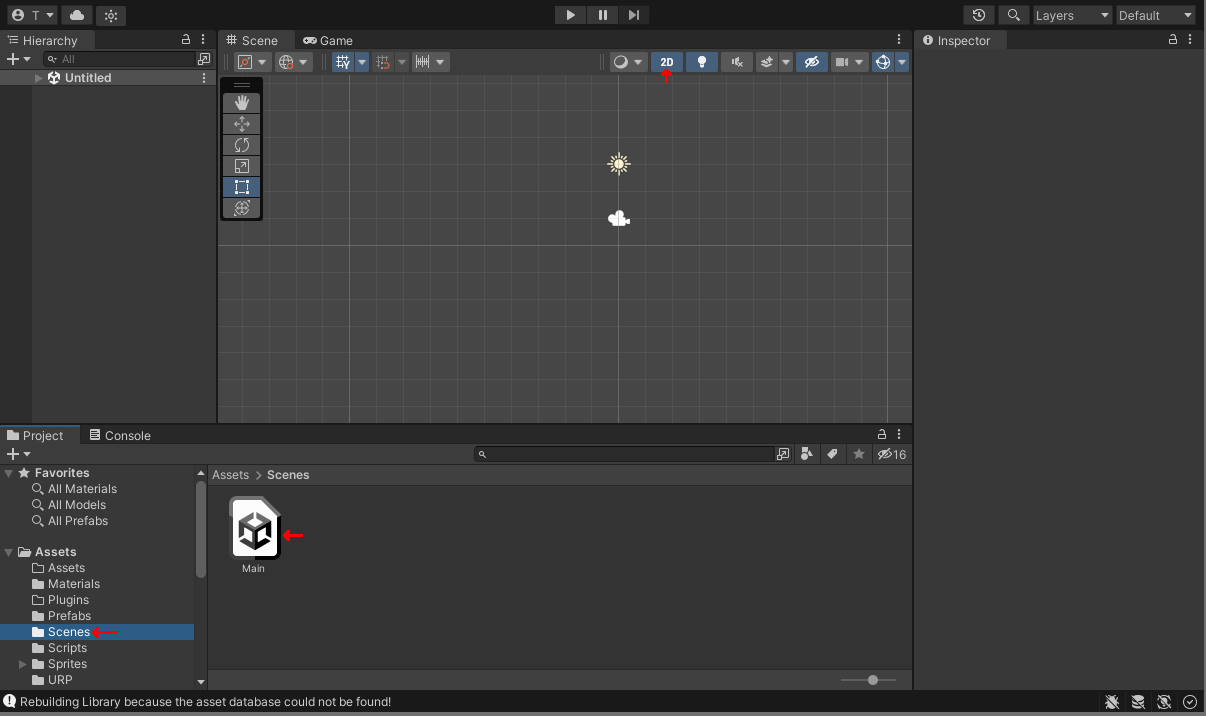
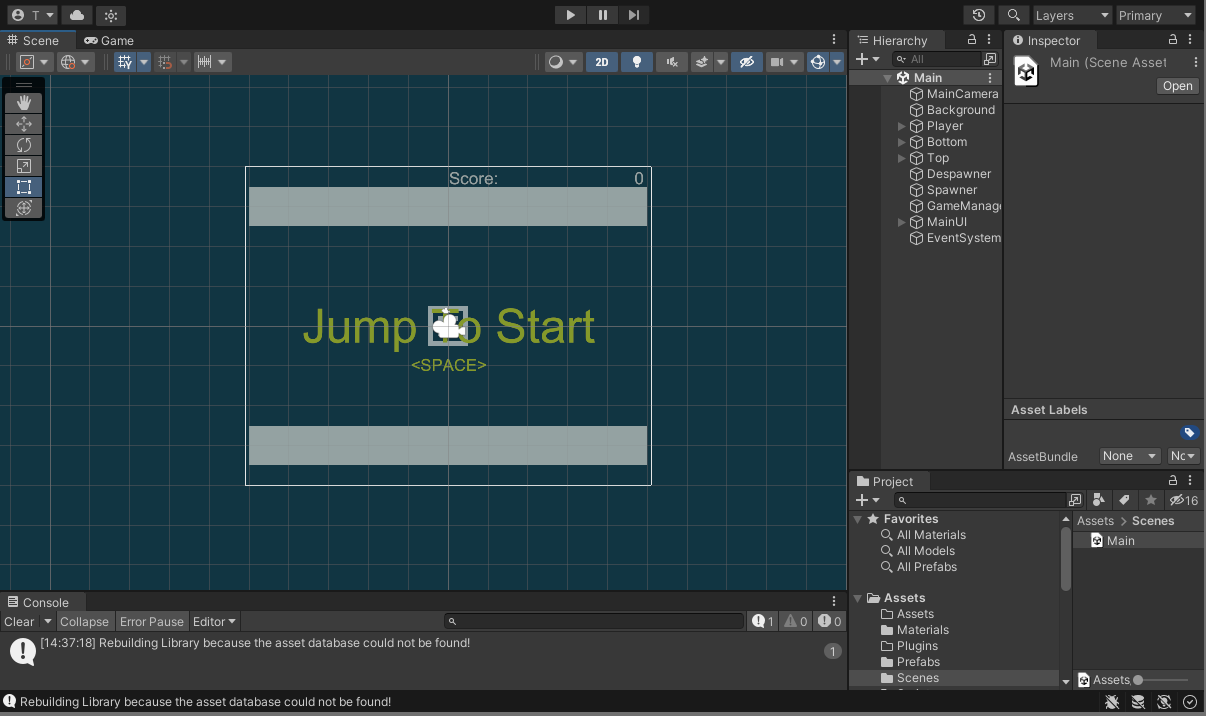
To finalize the import, go to Project -> Assets -> Scenes (red arrows on the image) and double click the Main scene. Next, make sure your viewport is in 2D mode by pressing the 2D button (red arrow). You also may want to switch your layout (Window -> Layouts). After that, your Unity Editor should look like this:

Lastly, you should initialize your Git repository - either by using a git graphical frontend, git on the command line, or any other tool you are comfortable with. This will be important during the submission, which includes a link to your Git repository. Note: You can use any Git hosting service - e.g., GitLab, BitBucket, …
To setup a repository using the git command line utility, first create it your git hosting of choice.
If this is your first time using git, I recommend reading through some detailed tutorial, such as the
one available at Start Using git. Then,
open terminal / command line in the root directory of the project (containts the Assets folder) and run:
$ git init
$ git remote add origin <REPOSITORY_URL>
Then, perform an initial commit:
$ git add .
$ git commit -m "Initial Commit for IZHV exercise #2"
and push the changes to the remote repository:
$ git push origin master
Then verify that the procedure completed successfully by going to the <REPOSITORY_URL> and check that the files have been added. If you would like to know more about git, you can see the Start Using git tutorial. Your workflow should consist of periodically uploading your changes, by performing:
$ git add .
$ git commit -m "Some sensible message about what you changed"
$ git push origin master
The Task
Your actual task in this exercise will be quite simple: Fix the Game. But first, I would advise you to look over the example project and get acquainted with the Unity Editor. The project is setup with some basic directory hierarchy, universal rendering pipeline (URP), and resources. The basics of the Unity Editor will be explained during the regular weekly lectures. To further help with getting to know the basics of Unity, some of the following links may be of use:
To start with, you should find out how to use the Main Viewport, what is the Hierarchy, and how to Run the Game. Any time you have a problem, Google is your friend. Can’t remember how to recover Component from a GameObject? Try Google! Or, if you are really lost, contact me by e-mail (Tomas Polasek : ) or reach out after the weekly lecture.
Now that you are more familiar with the Unity Editor, you should try running the game to find what is wrong with it. Do so now by pressing the Play button (right-pointing triangle on top of the screen). As you can probably feel, there are many problems with this little game - just to name a few:
- It is unclear : The game doesn’t make it clear how to control it. Hint: You can jump (Space) swap (W and S)
- It is quite difficult : The jump does not clear boxes and the swapping is hard to use.
- It is frustrating : Boxes are too large and collisions are unfair.
- It is repetitive : The boxes are spawning too regularly.
There are many ways to improve this little game and make it more fun. In this case, you will even get by without any programming. Of course you can the code as well! Your goal now is to take a look at the GameObjects within the scene - specifically the Player and Spawner - and try playing with the various properties of their Components. Try varying the gravity on the Player’s Rigidbody 2D or their jump in the Player script. Play with the spawn-rate of the Spawner’s Spawner script. If you are feeling adventurous, you can even try to make the boxes appear in interesting patterns by modifying the code of the Spawner script. Add another text which informs the player how to play.
Once you are satisfied with the resulting game, you can move to the next section to export the result.
Export the Result
To export the results, you should follow the steps specified within the Unity Exercises section of the Exercise Submission chapter.
Submit the Exercise
Submit the results according to the procedure detailed in the Exercise Submission chapter.
Task checklist:
- Install Unity and familiarize yourself with the environment
- Import the project template and play the game
- Improve the game and export the result
FAQ
Following are some problems and solutions which may occur during this exercise:
- None so far!
Materials
Unity Editor Layout : [wlt]
Project Template : [zip]